
Initially I attempted to replicate a realistic glass effect in maya by using various different methods. Above is a photograph which will serve as good reference and a storyboard for the finished shot.
Ill show you some of the failed render tests for the initial glass renders. I was disappointed with their outcomes and I was thinking of scrapping the shot from the film entirely, but it was bugging me and I wanted to push myself and learn how to render glass realistically using Maya.
Here are the initial renders.

Here I have used a a Blinn shader with a high transparency. I have also used an area light and a spotlight which is emitting photons. There are indeed interesting reflections here however the glass itself is far too overexposed.
Below are a couple of render tests which I carried out in order to experiment a new method of using Photons and Caustics in order to get some effective glass renders.
 In this render I tried to apply a simple transparent Blinn shader on the glass model and deleted the Anisotropic Shader. I used the same spot light which is emits photons and the caustic option is turned on. This didn't turn out so well again, however. Although I do regard this render to be more successful than the previous one because there are certain qualities which I like here. The glass itself seems to be more subtle and there are interesting subtle reflection and refraction patterns towards the base of the glass. There is also a very effective shading gradient near the rim of the glass. However all the interesting refraction patterns when using the Anisotropic Shader are gone, so the glass looks unrealistic and dull.
 A tutorial briefly mentioned that the use of a spot light emitting only photons can give effective results for glass renders. Applying what I had learnt, this is a test render using an Anisotropic Shader in conjunction with a spot light that emits photons. I have also enabled the caustic attribute. This render did not turn out as well as I had hoped, perhaps more tweaking in the settings is required or perhaps the Anisotropic Shader is interfering with the photons. The reflections are far too intense and distracting here and overwhelm the glass model.
 Above is the final test composite of the whiskey glass which consists of 3 layers, the diffuse final gather pass, an occlusion pass and a light and shadow pass. I am particularly pleased with this composite because it represents the look I wish to achieve for the shot within my animation short. It also demonstrates that I am developing and improving my rendering and compositing skills. I believe that the colours and the lighting is close to what I want in the finished film.
 This was the initial glass composite. The glass itself is too dark and the overall scene is too dim. I shall render a light and shadow pass in order to lighten up the next composite.
 At first I regarded this as a failed render. It is a simple light setup to illuminate the glass using an area light. I have no idea why the glass is so over exposed, perhaps material reflectivity and light intensity may have to be decreased. However I did use it as a highlight layer for the composite, which proved to be useful in as far as giving the glass a less opaque look by assigning this layer with the lighten layer property in Photoshop.
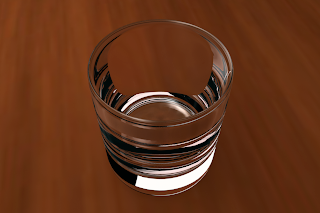
In this render I used an incandescent lambert shader applied to a simple plane to serve as a light source. This method created nice reflection patterns. This is a very simple and effective method of creating an illusion of a light source without using regular lights.
 This is an occlusion pass which will act as the second layer within the composite. I shall apply the multiply or overlay attribute to this layer.
 The image above is a simple test render where I attempted to apply what I had learned and use the same technique for the liquid within the glass. The render sort of worked however the refractions and distortions are quite wrong, and the liquid does not appear to be transparent enough.
 This render is more what I was hoping and looking for. It is by no means perfect as the distortions are not exactly accurate. However there are interesting refraction and reflection patterns. This is certainly the best glass render yet. Only Maya default lighting is present in this render, so it may be an idea to include additional lights to enhance the render. This method of using an Anisotropic Shader, however, is a clever and simple way of getting some effective glass renders without using photons and caustics. This render is particularly successful in that the glass is somewhat believable because volume and density is suggested.
 Again this render didn't work so well. I followed the online tutorial exactly. I may have to experiment with the settings.
 The image above was an initial render test using an Anisotropic Shader in conjunction withRamp Shaders to achieve the transparency and reflectivity of glass. This was a failed test however. The result here is poor probably because I missed a crucial setting in the tutorial. I shall go through the tutorial again.
 The render above consists of a simple transparent Blinn Shader applied to the 3D glass model. An area light is present as a light source. I like certain elements here, such as the interesting reflection and refraction patterns, however the glass itself does not appear to have enough volume or density here.

The images above show how I have attempted to experiment with changes in light placement. I have applied a simple transparent Blinn Shader to the glass and given the material high eccentricity and reflectivity levels. There are no additional lights present here apart from Maya Default Lighting. These renders are not great as the glass lacks volume, however there are decent reflection patterns here.
Below are vrious images showing my progression on a glass test render. I am attempting to apply a glass shader upon the 3D glass model.

 Above are two render examples where I was attempting to carry out more glass tests, focusing on tweaking the settings for the glass material. There must be something missing or perhaps the technique is wrong. I think there maybe a whole lot more technical attributes that need to be explored in order to get a good glass render. I am not looking for photorealism, however I want to get as close as possible as I think it could be fun and useful. If I manage to get a good render of glass I will certainly feel a sense of achievement and satisfaction.
 Here I was tweaking transparency and reflective settings. I managed to achieve some interesting refraction patterns within the glass, however they do not look realistic at all. There seems to be some odd reflections on the plane surface which look distorted and blurred.
 Here I have added a glass material to the glass model. Again it didn't turn out too well. It seems to have given the model a black glass shader. I was hoping for a more transparent look. The liquid also looks odd as it seems to be too opaque. I was rendering on a blue coloured surface just so that I could see how the photons were behaving. They seem a sprinkled and thinly spread. I may need to increase photon emission intensity.
 Here I was experimenting with the maya materials and the water/ liquid shader. It did not turn out too well, perhaps I need to add some lights and maybe experiment with photons and caustics which I've heard are important when rendering glass.
 Above is an occlusion render pass. With these layers I can composite them together within photoshop or adobe after effects to get the desired look I want.
 Above is a simple final gather test render.
Above is the wireframe of the whiskey glass. I want to learn how to carry out effective glass renders.
The link below is an online tutorial site that shows you how to get an effective glass shader. I used this site in order to learn a different approach to acquiring a glass effect.
http://www.spafi.org/index.php?option=com_content&task=view&id=468&Itemid=29


The image above is a photograph I took for reference purposes. I want to try and recreate this image using Maya. I want to explore different ways of getting an effective glass effect, I want to see how close I can get to the image above.
No comments:
Post a Comment