Now I shall be experimenting with the various different glass material shaders. I really want to learn how to render realistic glass in Maya as it has been bugging me for a while and I always wanted to know how to go about it. After searching the internet I found various decent tutorials on digital tutors. as well as some tutorials on youtube.
Firstly I shall be looking at the presets I can experiment with below in the mental ray node material tab.

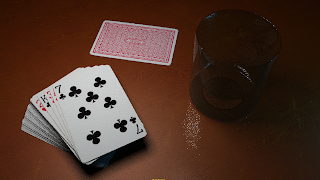
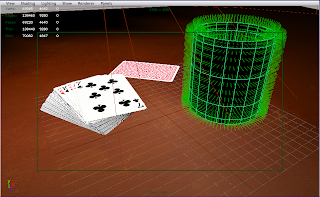
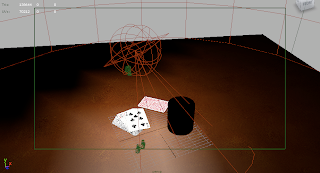
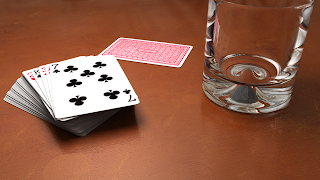
So once all the basic setup had been taken care of,the scene looks something like this. I have the textures on the tabletop and on the cards applied, A camera has been setup and lights have been placed. All I need to do now is apply material shaders to both the glass and the liquid. I also turned on final gather to simulate accurate bounce light from surfaces within the scene.

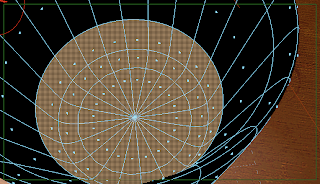
I started by utilizing the approximation editor in order to sub divide the glass and liquid model. I then applied a glass physical material to the glass. When rendered the glass appeared black and very dense. There seemed to be some odd artifact where the lambert of the liquid seemed to be reflecting on the outside of the glass.
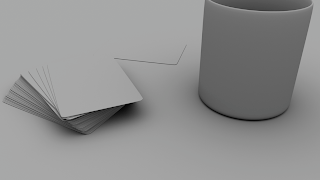
 To avoid confusing matters I decided to remove the liquid from the glass so I could see clearly what was happening with the glass material.
I then tried using a blinn again with its transparency set to 95% and its reflectivity set to a value of 900. Decent reflections were being portrayed however the glass itself had no volume and appeared too thin and unrealistic. I want some black reflections and highlights / refractions in the glass to acquire that realistic look.

I then used a glass solid material to the glass. This turned out better however still I was unsatisfied with the appearance of the glass. The glass seemed tinted and the glass still lacked volume.

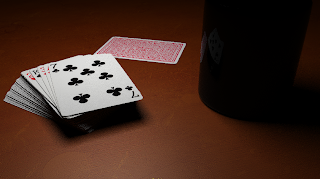
I then used a glass thick material and set its blend to 75% and its weight to 50. This render is even better still. The glass has weight now and there are effective reflections and refractions. What I am most excited about though is the way the glass is behaving towards the base of the glass. There are some great refraction patterns forming and there are some nice black refraction indicating volume. However there is an odd reflection forming in the centre of the glass. There is an oval shape which I think is being formed due to the refraction of the glass base.

I then used a glass thin material with its blend set to 75% and its weight set to 50. This render is slightly worse as the glass is beginning to turn black and it seems too thick. Plus the odd oval refraction has become more pronounced. Not sure what is causing the glass to appear black or why there is a refraction issue.
 A much better render. I set the blend to 25% and its weight to 30. I thought that perhaps if I lowered these values the glass would become less dense.
 I then decreased the values even more using glass thin material. I also thought that perhaps by increasing the intensity of the lights this may get rid of the black reflections. Seems to be working.
Seeing as the glass settings now seem to be on the right track I started experimenting with different HDRI Maps to acquire different lighting results using the light information contained in the HDRI image. Here is the HDRI setup. In the mental ray tab under environment I checked Environment based lighting on and loaded in different HDRI images. A lot of trial and error was required and I tested several HDRI maps before getting one that worked well.

This render was awful. Horrible colours were being reflected and the reflections themselves seemed distorted.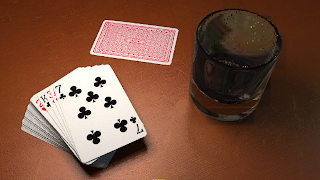

I decided to use another HDRI image to see if I could get a better render. Unfortunately it did not turn out much better. The scene is also too illuminated in my opinion.

The glass rendering was getting better however I felt that it was far from perfect. I did more research and I found a tutorial online indicating that using a dielectric material for glass is generally a better option as it is designed to replicate the retractions of both glass and liquid.
When I initially applied the dielectric material on the glass, something unexpected happened and I was really concerned that I was back to square one. The glass appeared totally black, similar to what had happened to the previous render tests, I was thinking perhaps that it was the black surrounding environment that was causing this issue. So I created a dome around the scene and applied a warm peachy beige colour lambert on to the dome. This did not help either, and the result was the same. I feel stuck at the moment, and don't know what else to do. But Im not going to quite yet.
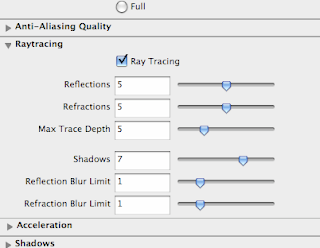
I then found additional information which stated that in order to simulate glass you must adjust some additional settings. So I was instructed that in order to obtain a glass effect I had to go into the raytracing tab and put an input of 5 in Reflections, Refractions and Max Trace Depth. What this will hopefully do is tell Maya and its lights to penetrate the glass surface. Because my glass has thickness to it my glass has 4 layers for which the light rays need to pass through and interact with to cause realistic refractions and reflections. So I applied these imputs and hit render.
I discovered by accident that when I lowered the camera angle to a more horizontal orient this seemed to solve the odd oval refraction that was appearing. Also I think that perhaps altering the index of refraction to a lower setting may also help.
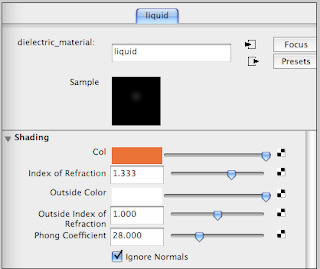
This is the best render yet. The glass is really starting to look realistic and the volume of the glass is really effective. There are some great retractions now towards the base of glass and the odd oval refraction is no longer an issue. In order to acquire this finish I applied a dielectric material to the glass model and I was recommended by the tutorial to set the index of refraction to 1.5 to replicate the accurate angle of refraction of real glass and its outside index of refraction to 1. I also changed the Phong Coefficient to 28 to make the glass appear shinier.

The tutorial also explained that I had to switch on global illumination on in order for the reflections to work effectively. I think the scene however is somewhat on the dark side. I need to brighten this scene up. An HDRI map should do the trick, however I have to find a decent HDRI map and hope it works.

I then tried using this HDRI map which I found on the internet, this looks promising.
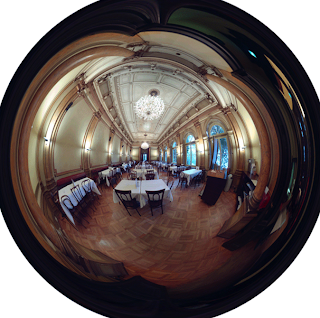
Now thats what Im talking about! Ok the scene is perhaps too bright but that can be fixed in the compositing stage. A very nice image and more detail can be seen as a consequence. Now for the liquid. I really feel like Im getting somewhere with the glass. So it seems glass metal ray node materials are dead and dielectric materials are the way forward, I shall remember this.

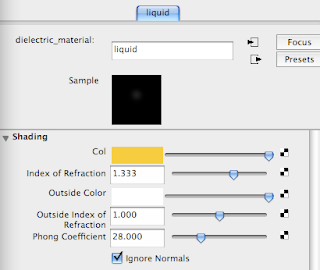
The tutorial explained that for good liquid refraction renders I must put an input of 1.333 in the index of refraction and the same Phong Coefficient as the glass material. Initially I also chose an earthy red colour for the whiskey.
I unhid the liquid model and applied a dielectric material to it. I was a little confused as to why the render turned out like this. The liquid appears more like coca cola than whiskey. And there is an odd grey band towards the top of the liquid.
I checked through research that it was perhaps because my normals were facing the wrong direction and that my glass model normals should be facing outward on the outside and inward in the inside. The normals in the liquid should also be facing inward. So I went ahead and inverted these normals. I re rendered but there were still some issues towards the top of the liquid.
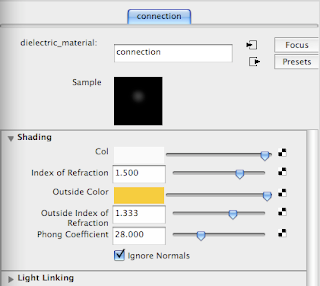
I also had to make a separate dielectric material to serve as a connection between the glass and the water so as to get rid of any anomalies where the glass and liquid interact.
I had to select the outmost faces of the liquid and the faces on the inside of the glass and apply the connection material. I had to make sure the input in the outside index of refraction of the connection dielectric material matched the index of refraction of the liquid material. Both had to have an input of 1.333 in order to interact correctly and for the refractions to behave similar to how glass and liquid bends light in reality.
I also tried altering the liquid colour and the inside face glass colour to match one another exactly. I had to make sure the colour was the same for both, fortunately this was easily done using the colour input system. This was so as to avoid any further anomalies wherr both materials interact. I figured that perhaps by making the colour a little yellower would create more orangey refractions/ highlights. This is the hope anyway.
(H) Hue = 44.10
(S) Saturation = 0.881
(V) Value = 1.000
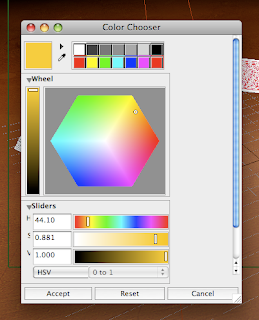
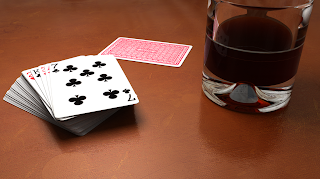
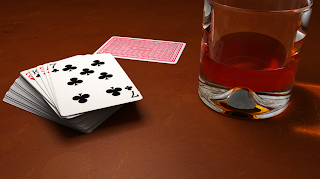
There much better. There are no interaction anomalies now and the colour of the liquid itself is far closer to the colour of actual whiskey/ cognac, it seems my theory was correct. There are some lovely orange highlights towards the base of the glass which I am particularly pleased with.

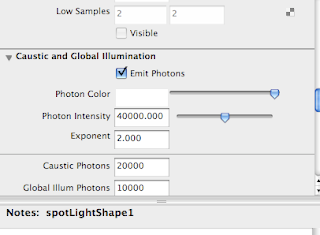
Now for the Caustics. The tutorial explained that the best way to obtain effective caustics was firstly turn on global illumination and caustics in the mental ray options.
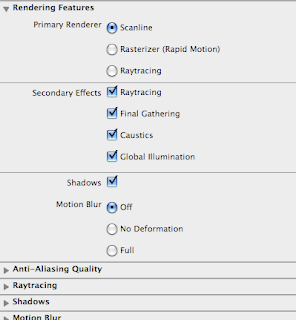
The tutorial then stated that in order to acquire caustics, the most effective way is to create a spotlight. This spotlight will emit no light at all but instead emit photons. Photons are required in usually excessive amounts to get decent and accurate looking caustic effects which are created when glass and liquid bends the light which penetrates it and these refractions are projected on surfaces beneath.
So I went ahead and increased photon intensity/ output to 40,000 to make sure that the caustics would work effectively.
The caustics are working much better here.
I thought that the actual volume of the whiskey was perhaps a little too high so I had to re adjust the liquid model hight and also tweak the connecting faces, so I brought them down, lower towards the base of the glass. I was unhappy with the composition of the shot, and I thought a lower volume would look aesthetically better.
I re rendered and the shot was nearly complete. I was extremely happy with the way things were going, indeed for me this was a real achievement. I did think however that the shot could be improved a little in as far as camera placement/ angle. At the moment the shot felt a little contrived and too perfect, so I decided that I would offset a few elements. The card refraction in my opinion was too overwhelming and so too was the caustic pattern. So I lowered the camera frame so that it would crop a little off the top of the glass. And reposition the cards a little to the left. My theory was that if a shot is too balanced it looks fake and too perfect, so I wanted to introduce a little irregularity. I remembered my research during my dissertation that particularly nowadays uneven composition is far more aesthetic. To work in thirds is better than working in twos. So I tried it out. Alex also suggested that it was a better option and again I think he was right.
I rendered an occlusion pass for ambient shadows. This will help particularly in bringing out the glass from the table, particularly toward the base of the glass to introduce a little more depth. Subtle but occlusion really can help.
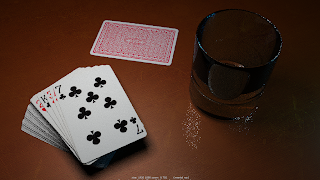
This is the non composited render.
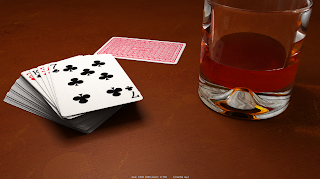
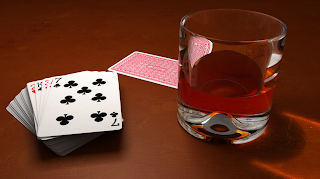
Below is the final render with the occlusion and final gather render. I also added a few more details such as scratches and watermarks on the glass. I added a vignette and toned down the reflections. I lightened up the wood by changing the hue to an orange colour and increased both brightness and contrast. However this did not work so well without ruining the colour of the wood. So I decided to use a previous render to lighten up the image (below).

I switched the render (above) to a screen property layer in photoshop and overlaid it on to the final render (below) in order to brighten up the image so that is was less red in hue.

Original Storyboard
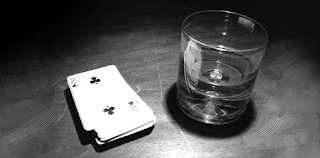
I am very pleased that I was able to render something that closely simulated glass and liquid. Very happy that I could create something that closely resembles the original storyboard.
This whole process took roughly 1 day and was tremendously intensive and at every accomplishment was confronted with a new problem. However through perseverance and research I managed to render something I am truly proud of and looks realistic and somewhat photographic. I am proud of myself and impressed with the results. It was well worth it because I learned a lot technically. The liquid is refracting the table in an odd way and I tried tweaking the index of refection inputs to a lower setting but there wasn't much change. To be honest Im pretty chuffed with what I have and this has certainly been a huge learning curve and is a vast improvement to previous attempts. Its by no means perfect but I could work on this scene and tweak it forever and its time to move on.
No comments:
Post a Comment