Friday, 20 May 2011

Apartment Exterior Lighting


The Exterior apartment is coming on very nicely, and I think by the end of this we shall have a very nice backdrop rendered. To begin with the scene itself was very sparse in areas and my brother decided to introduce a little more detail by introducing signs, and an awning etc. He also recommended that we should redesign the street lamps and perhaps introduce a few more light sources to make for a more interesting scene. I was a little skeptical of the idea at first as I was concerned that perhaps these extra details may not only increase render time but also distract the viewer from the centre of focus which would be our character.

We started by remodeling the street lamps and Alex was in charge of texturing the scene. I began tweaking the light setup in the scene. We rendered it and still Alex felt something was missing and he suggested we model a neon hotel sign to add a new light source and dimension to the scene to enhance the scene and introduce a little more noir to the render. I thought this was a very interesting idea so I went ahead and created a hotel sign using reference.
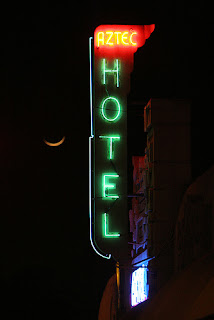
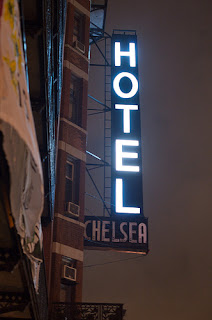
I thought that these images were most appropriate for the time period and mood I was trying to emulate. The Reference image I used the most was the image just above. I was unsure however how to create a glow effect on the neon light itself. Fortunately Digital tutors had a tutorial for creating such effects. There was of course the use of an area light however this would increase render time and when I tested it, the light only illuminated the surroundings and did not provide a glow effect to the actual lettering. The other method was the use of a simple surface shader and applying an outer glow to the shader itself. I carried out a render test and the effect was far more agreeable.
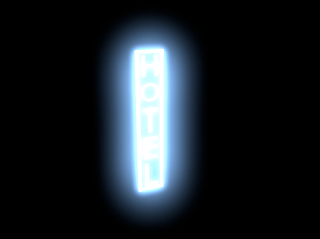
The initial render was creating a nice glow effect, but was only noticeable once the render had finished so we had to be mindful of that when rendering using final gather, which takes far longer. The render above however had too much glow and the lettering was getting lost. So I tried lowering the intensity of the outer glow setting.
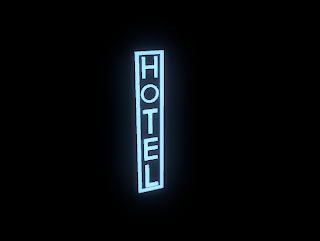
There much better. However perhaps a little more glow is needed here and I may need to get rid of the sign border as it seems to be overpowering the letters.

The renders above were just served as simple lighting tests. I then remodeled the neon light sign to add a little more detail.
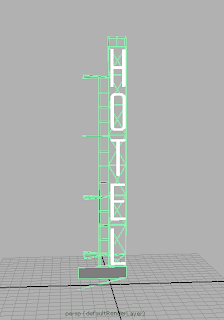
I tried out different colour lights, I firstly tried green but I think blue fits a little bit better with the scene seeing as blue light is coming into the interior scene. We rendered the whole shot again, however Alex still thought something was missing and suggested that a pharmacy light may introduce a little extra to the overall composition. I was again skeptical and was worried the scene was becoming too busy, however when he rendered it it did look very cool. I admit I was wrong and Alex was right when it came to enhancing this shot.
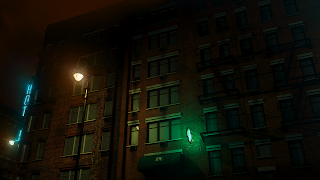
Above is a rendered version of the finished backdrop, with a little post so that the render itself is not so "clean." Render and compositing done by Alex Caldow.


Improved Apartment Interior


My brother and I decided that the apartment was too sparkly decorated and some scenes may look very dull to the audiences eye. Thus we decided to decorate the room with a bit more detail including more props and furniture to liven up the interior environment. We felt that an extra light source would bring a new dimension to the overall mood of the scene and introducing a little more illumination to the scene.


Here is the updated scene with some photoshop tweaks to give a suggestion of atmosphere.


Before
Rather vacant and bare.
After
Atmospheric and "lived in."


Thursday, 19 May 2011

Character UVed


It has taken a while to get hold of somebody to UV our character. We asked Fahran initially if he would be willing to UV our character so we could progress with the texturing of our character. However he was unable due to the fact that he was preoccupied with his own project. This delay hampered our progress, however we made sure that we were carrying out different tasks that needed to be completed so that we would not be wasting time. The last thing I wanted was for both my brother and I to be waiting for his availability. Thus we continued to texture other scenes and begin rendering various prop/ cut away shots.

Eventually he was available and he managed to do a good job of UV Mapping our character. This whole process took roughly 3 weeks, which I was not happy about however we were making headway elsewhere. My concerns however were that our character may not be prepared in time for rigging and texturing, which would thus put us behind schedule. I am worried that we will not have a character to animate. No character means no coherent story. I'm not too kean on having just prop animations to promote our animation short. However the shots we will be producing will be of a high standard.


UV Layout by Fahran Younas.

On closer inspection and texture testing we discovered that the hair needed to be re textured. Fahran was happy to rectify this issue.

Complete Character Model


Here are some occlusion renders, one with and one without the jacket and hat. These were to help us find out if there were any problems with the mesh. I was concerned that perhaps we had missed areas that needed tweaking or perhaps missing faces.

The jacket in sub divided mode. Very pleased with the way this turned out and I am happy that we managed to get the clothing to seamlessly hug to the rest of the character. Quite a bit of model tweaking was needed so that Frank's body geometry was not poking out of the clothing.

We also modeled a Jacket to go over the character for the final shot of the animation short. Initially it was tricky to get our heads around how it would work. To begin with we started by using the character mesh to extrude the clothing geometry, however this caused problems with the mesh. So we decided to model the clothing separately. This way it was easier to manage the character particularly when it came to the preparation stages for animating. The only concern is how we will manage to animate the clothing with the rest of the character. I am concerned that the character geometry, when animated will pass through the clothing geometry. However after asking around, Clym suggested that we could use the wrap tool in the animation pane which should solve our problem. He explained that once the clothing is wrapped around the body, the clothing should be effectively parented to the rest of the body, thus preventing geometry from being displaced.

Although the character in non sub devided mode looks a little bit of a mess, once sub divided through the approximation editor, the model looks way more impressive, I am very happy with the result. Its not exactly how I wanted but I am pleased with what we have managed to achieve.
Here is the final Character model and its wire frame in non sub divided mode. Both Alex and I helped each other to create this character model. It was a huge learning curve but Im glad I persisted and learnt how to model a character. A lot of tweaking was involved in order to get the proportions more accurate and thus render the character more appealing. Most of the tweaking had to be done in the arms, torso and legs.


Sig Sauer Improved


Below is the revised lighting and scene setup for the new sig sauer composition for the shot. The main light source which is the larger area light has been moved behind the sidearm itself. Another extra secondary light source has been added, the smaller spherical area light. This will introduce a secondary rim light that will add a new aesthetic dimension to the overall shot and composition and will serve as the blue light which will permeate the room.


Occlusion Render Pass
This pass will help to introduce more depth to the overall render.


Final Gather Render Pass
This layer simply is not enough, so we decided to introduce more detail to the weapon texture, we also needed to dial down the eccentricity and reflectivity of the wood texture blinn so that the bullets would not create such an unrealistic refection. I did not want the wood to have a polished finish and appearance. The bump map also needed to be increased in order to get some wood grain effect which is absent in the above image.

After

All the above layers were combined to create this composite. Scratches and textures were overlaid over the top of the final gather render on the pistol only to suggest that it has been used and so that the textures were not too clean. A slight vignette has been added purely for photographic aesthetic effect. The bump map works really well here and is enough to get some really nice highlights and shadows to the grain of the wood texture. Indeed the suppressor has been mostly cut by the frame, in the end some compromises had to be made to this shot. In my opinion it does not really matter that the silencer is no longer in shot. The gun itself is informative enough to the viewer.

Original Storyboard
The composition here initially felt right and informative, however Alex recommended that the shot should be changed for a more interesting one that was more appealing to the viewer. In this case I have to agree with him.

Before
I decided that this previous render and composite was dull visually and needed some improvements. The shot was also too contrived in my opinion and the camera angle was not creative enough.

Sunday, 20 March 2011

Frank Character Model: Hands


I was responsible for constructing the character's (Frank's) hands in maya. This was perhaps the second most complicated feature I have had to model regarding character modeling. I have never attempted character modeling before, however I was pleased with the way this model turned out. I had to model it in such a way that it had to easily connect to the rest of model such as the arms. I didn't want the model to be too polygon heavy and I needed the polygons to all have four sides, no more no less, as I needed to model this hand correctly so that it can be rigged, uv mapped and animated easily.

Frank Character Model: Head

Modeling the character's (Frank's) head was the most complex asset of the character to model. I have never tackled anything like this and I used an online tutorial to help me. I am very pleased with the outcome. I had to make sure that all the polygons had exactly four sides. I had to make sure that the topology was correct, and that the eyes and mouth had edge loop rings navigating around them to enable the model to be effectively rigged and animated.

Modeling the head took several attempts as I wanted the topology to be perfect. I managed to find a very useful head modeling tutorial on Youtube,